Introduction
Ever wondered how baristas create those stunning, Instagram-worthy designs in your coffee? The art of crafting these intricate patterns isn’t as unattainable as you might think. In fact, mastering latte art can be a rewarding skill that transforms your everyday coffee into a work of art. As you explore the mesmerizing world of coffee aesthetics, you’ll discover that with the right tools and techniques, you too can impress with every pour.
Ingredient List
Crafting perfect latte art requires more than just coffee; it’s about blending the right ingredients with skillful precision. Here’s what you’ll need:
- Espresso: Choose a rich, bold blend. Dark roast works best for a full-bodied flavor.
- Milk: Opt for whole milk for its creaminess, but feel free to substitute with oat or almond milk if you’re dairy-free.
- Pitcher: A stainless steel one with a pointed spout is ideal to help control the pour.
- Saucepan or steaming wand: To froth your milk to velvety perfection.

Time
Creating latte art is less time-consuming than you might expect. The total time from espresso to art is approximately 6 minutes, which is 20% less than the average breakfast prep time. Here’s a quick breakdown:
- Preparation Time: 4 minutes
- Total Time: 6 minutes
Step-by-step Instructions
Step 1: Prepare Your Espresso
Brew a shot of espresso using your coffee machine. Ensure it’s a strong, robust shot, as a weak espresso won’t hold up well under the milk.
Step 2: Froth the Milk
Use a steaming wand or a saucepan to heat and froth your milk. Aim for a smooth, velvety texture with fine microfoam. The milk should be glossy, resembling wet paint.
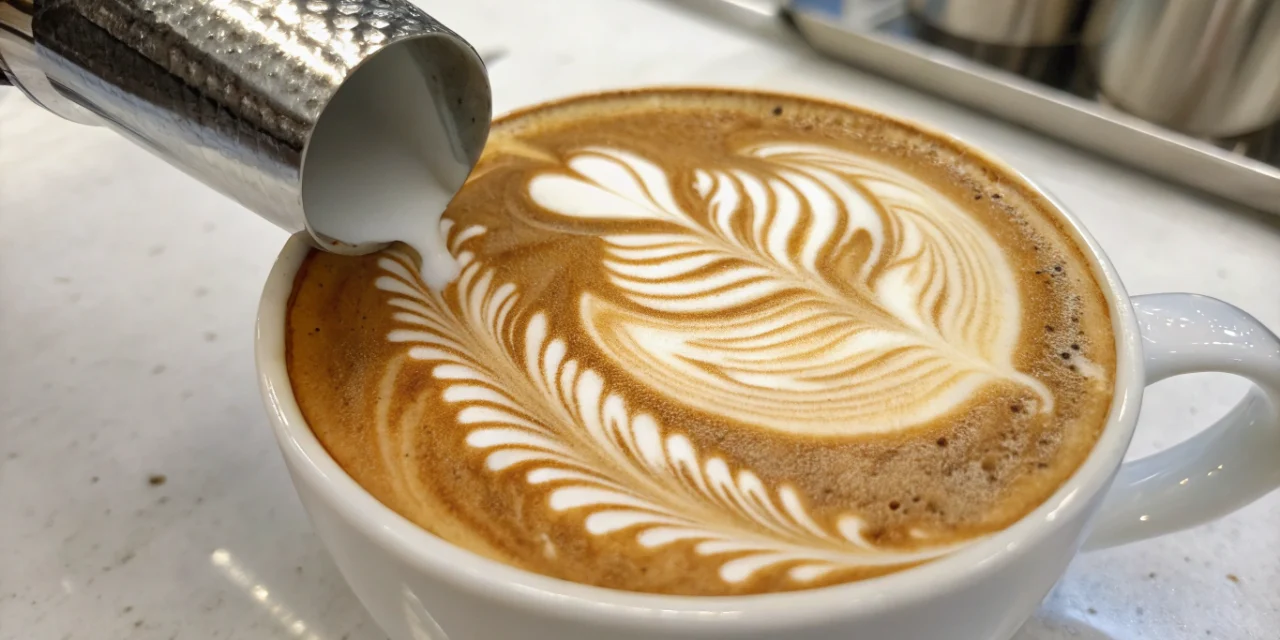
Step 3: The Pour
Begin by tilting your cup slightly. Pour the frothed milk slowly into the espresso, maintaining a consistent stream. Start high to incorporate the milk and then move closer as you draw the design.
Step 4: Create Your Design
Once near the cup, increase the flow slightly, and wiggle your hand gently or draw shapes to form your desired pattern. Finish with a flick of the wrist to create a heart, rosette, or tulip pattern.
Nutritional Information
Understanding the dietary components is crucial:
- Calories: Approximately 150 per serving
- Fat Content: 8g of fat, mainly from milk
- Protein: 6g of protein per serving
- Calcium: Significant, due to the milk content, with 20% of the daily recommended value
Common Mistakes to Avoid
Beware of these common mistakes that could thwart your coffee masterpiece:
- Overheating Milk: Keeping milk under 150°F prevents it from scalding and burning.
- Using Low-fat Milk: Whole milk creates the creamy texture crucial for proper froth.
- Pouring Too Fast: A slow, controlled pour allows patterns to develop.
Recipe Storage Tips
To preserve the freshness and flavor of your coffee:
- Only froth the milk you need for immediate use.
- Keep espresso grounds stored in a cool, dry place away from sunlight.
- If making multiple cups, always clean your pitcher thoroughly between uses to prevent residue.
Conclusion
By honing your skills in latte art, you can transform a simple morning ritual into an artistic experience. Embrace this journey, share your creations with friends, and inspire others with your newfound talent. Ready to pour, create, and impress? Share your progress, and don’t hesitate to explore more on this captivating craft.
FAQ
Q: Can I use alternative milk for latte art?
A: Yes, oat and almond milk work well but require a slightly different frothing technique due to their lower fat content.
Q: How do I prevent my design from disappearing?
A: Achieve the right balance between milk and espresso. Too much milk can dilute the espresso, overwhelming the design.
Q: Is practicing on later pours necessary?
A: Yes, patience and practice drastically improve technique. Start simple and work towards more complex designs.

